“When and how you should use photo references to draw?”
Too often I find that people use photo references out of laziness. Be careful that if you decide to work with photo references, that it’s for a very specific need, not because of convenience. Photographs should only be used when direct observation of a subject is absolutely impossible.
If you’re an illustrator and you’re creating a illustration about prehistoric animals, obviously that’s not an image you can draw from life. However, there are many subjects where it’s very possible, and in some cases very easy.
For a still life drawing, get the actual objects and set them so you can directly observe them from life. I’ve literally seen students search for a photo of an apple online so that they can draw an apple. Is it really that hard to buy an apple to draw from life?!?
If you are drawing a self-portrait, it’s easy enough to get a mirror and draw from that. The 15 minutes it takes to figure out how to set up your mirror and drawing board to draw a self-portrait are seriously worth the time.
Anything that you can possibly observe from life should be done in this way. Nothing can substitute experiencing a subject in real life: being able to touch it, smell it, walk around it, inspect it, experience it, etc. Staunchly set direct observation as your number one priority whenever possible.
I’ve also seen many professional artists work with a variety of other references that are just as effective, if not more so, than photo references. Artist James Gurney fabricates sculptures of dinosaurs for his paintings. After sculpting the dinosaur in clay, he paints the sculpture and then draws from the sculpture as his reference.
My RISD colleague and former professor Andrew Raftery painstakingly creates complex 3D models of interior spaces and using wood and wax figures as references for his incredible engravings.
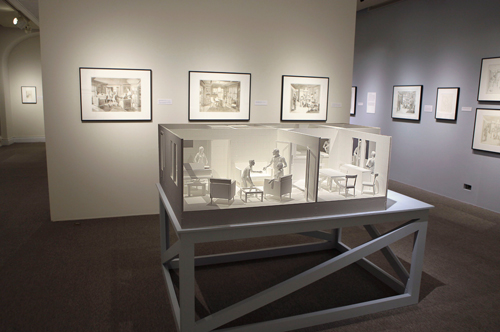
You can visibly see in this side-by-side comparison of Raftery’s 3D model and finished engraving how critical the creation of the 3D model is in constructing the interior scene. The lighting and spatial relationships are literally re-created in the 3D model and are thus incredibly convincing in the completed engraving.

If you’ve decided that photographs are indeed the only option for your drawing, the next stage is to do everything in your power to shoot the photographs yourself. If that means taking a trip to the zoo to take photographs of the gorillas, then do it. I know it’s very tempting and easy to go on Google Images and simply pull a photograph off the Internet.
In the video tutorial below, Art Prof Teaching Artist Cat Huang demonstrates how to shoot your own reference photographs for a digital illustration.
In the video tutorial below, Art Prof Teaching Artist Alex Rowe travels to a local farm to observe sheep in person, and do sketches that are then translated into an illustration.
However, when you use someone else’s photograph, your drawing will be vastly limited. You won’t be able to control the point of view, you can’t zoom in to get more details, and most likely the resolution of the photograph will be poor. Take the initiative to go to your subject and photograph it from every point of view. Shoot close up shots of specific areas so that you have all of the information you need.
In the video preview below, Alex travels to a cemetery in Concord, MA to shoot reference photos for his illustration of the Legend of Sleepy Hollow.
The only time I would advocate using someone else’s photograph as a reference is if there is absolutely, one hundred percent, no other way to get the visual information you need. For example, if you are doing an illustration of an elephant, and you need details of the wrinkles in the skin, that’s a circumstance where you’ll need to use someone else’s photograph. In general though, someone else’s photograph should be the last resort in terms of references.
In the video tutorial below, I use photos I found online to create an editorial illustration based on Hiroshima. In this case, I needed photos of a gingko tree and also Hiroshima to construct the image.
When you do get to the point where you are working from a photograph, think about it as a process of gathering raw information which you then edit and manipulate. There is nothing artistic or creative about copying a photograph verbatim. If that is your intent, you might as well xerox the photograph and be done with it. I
Instead, take the raw information from the photograph and process it and shift it. change that raw information into something new and engaging. Be highly selective about what visual information you choose to use. Just because something is in the photograph, it doesn’t mean that you necessarily have to use it in your drawing. Think about yourself as an editor, where you get to choose from a vast buffet of visual information.
Comb through all of the visual information in the photograph and use only what is going to help facilitate your drawing in a positive manner. I also find that it’s very helpful to work from multiple photographs, so that you are not so reliant on a single photograph for all of your information. You can take visual portions from each reference photo and mix them together according to your needs.

Drawings that use photo references successfully always look better than the photo reference. If the reference photo is more engaging than the drawing, then it means that the drawing hasn’t done anything to fully manipulate beyond just copying the reference photo.
In the above image, you can see that the drawing at the figure gripping it’s face has very aggressive compressed charcoal marks that are not apparent in the reference photo. The reference photo looks static, flat, and posed. The drawing took major liberties with the charcoal marks and therefore is much more full of action and tension.
In the image below, you can see the student’s reference photos that he shot at the bottom. The reference photos provide raw information, but the two drawings are far more interesting than the reference photos. The reference photos have very flat, boring black backgrounds and the facial expressions are not very dynamic. In the final drawings, the student greatly manipulated and distorted the facial expressions to make them much more dramatic and exaggerated.

It’s extremely difficult to use a photographic reference well, very few people do it successfully. In my drawing classes at RISD, I spend half the course giving assignments that must be done from direct observation the entire time. In the second half of the course, I open up references so that students can work from a variety of visual references: imagination, from photos they shot for the specific drawing, from photos online.
When I switch over to open references in my courses, the reaction of pretty much all the students is: “Thank goodness, this is going to be so much easier now that I don’t have to draw from life and I can work from photos!”
Actually, the complete opposite happens: students realize after the first critique that creating excellent reference photos is an art in itself. I critique their photo references: we talk about their light source, choice of location, their choice of models, what their models are wearing, the posing of the models-the works.
So many problems emerge in the reference photos: tons of factors distract in the reference photo, the set up looks fake, etc. Making the transition from the reference photo to the drawing presents its own unique set of challenges which is not nearly as straightforward as many people initially think.
Personally, I find drawing from a reference photo much more difficult than drawing from life, because the temptation to simply copy the photo is always there. When you draw from observation, you have to visually interpret and innovate.
I firmly believe that the only way to truly learn how to draw from a photograph well is to establish a solid understanding of fundamentals in drawing with years and years of experience drawing from direct observation.
Once you have solid skills drawing from direct observation, these skills will allow you to draw from a photograph successfully. This article talks about how direct observation will provide the basic foundation to be able to work from any visual references successfully.
Artprof.org is a free website for learning visual arts which features video tutorials, art critiques, and more.

Thanks for the video. Truly inspirational!
Just awesome, info i needed on using references in art
I have always traced my photos onto the canvas before starting. I have seen tons of artist’s agree that’s it’s ok to trace.
Do you ever trace? Or use a grid? When i paint from a photo, say a portrait, i emmediately am tensed up because i feel it has to be accurate. Would it look cheap if i decided to paint it in one go without accuracy?? Is this something that many artist’s do? Far too many youtube videos telling you to do things very representational. I’m confused.
I don’t trace or use a grid, for me the process is too rigid and technical and would take all the fun our of the drawing process. I don’t think tracing or using a grid is wrong, and perhaps it works for some people, but I know it wouldn’t work for me. I don’t think it would look cheap if you paint in one go, for me that would be fun! I’m someone who really doesn’t care about accuracy, but I’m sure other people would disagree with me.
I appreciate your reply Clara!
Yes, I am just one of those who find it almost disturbing (OCD) to consider un-compositionally correct. These things depend on a person’s dispostion sometimes also. I’m not a very relaxed person and i feel urgency and dischord very easily. Same reason why i get stuck too soon on things way before covering the canvas completely.