
“How do you develop an idea from a sketch in to a more refined and finished piece of work? How many sketches do you make and how much detail would you include in the first draft?”
Preliminary sketches are absolutely critical to creating a finished piece of artwork, and yet I see so few artists prioritizing this part of the process in their artwork. It’s always surprising to me when I see artists completely bypassing preliminary sketches entirely and just jumping blindly into a finished piece with no preparation whatsoever.
Unfortunately, many artists view preliminary sketches as a waste of time that gets in the way of working on the finished piece. It’s actually the opposite: preliminary sketches, when done well, will actually save you many hours of unnecessary frustration and backtracking when working on the final piece.
Creating successful preliminary sketches is all about making smart transitions, both in terms of scale, complexity, and focus. The process from sketch to finish should feel like a natural progression which gradually brings you to a finished work.
Below is a video tutorial a video tutorial on how to brainstorm, sketch, and create a drawing from beginning to end.
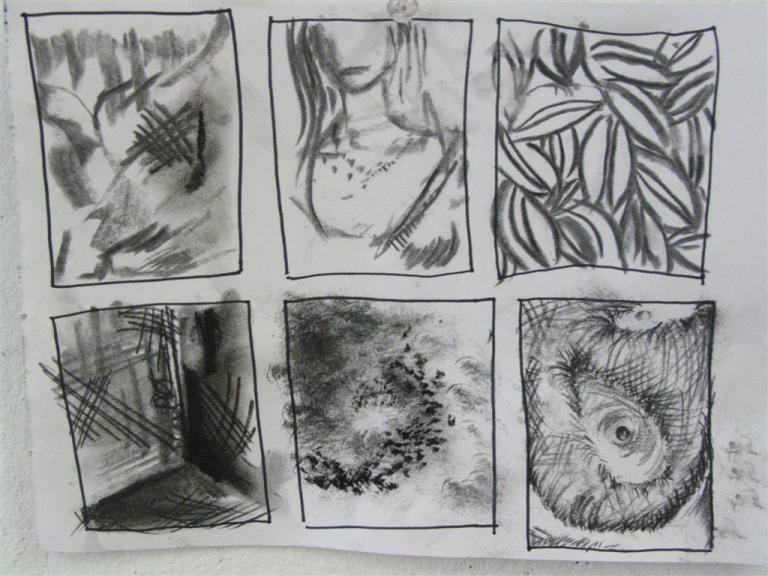
I’ve broken up the preliminary sketch process into four general phases below, using sketches from one of my student’s drawings as an example of the progression for the sketches. Naturally, you have to troubleshoot a system that is most appropriate for the kind of work that you do, but this list provides the basics and a place to start.
1) Brainstorming
Address the conceptual aspect of your piece. Make lists of ideas and subjects that you might want to pursue and write everything down. Play “word association” with yourself to come up with potential concepts. Entertain every single idea that occurs to you, no matter how silly it may seem at the time.
Looking up key words related to your subject matter in the dictionary can be a good starting point. The dictionary definition can often times stimulate ideas and ways of looking at your subject matter that you may not have been able to come up with on your own. This article I wrote goes into more depth about specific actions you can take to initiate the brainstorming process.

2) Small thumbnail sketches
These sketches should be small in scale (around 4″ x 6″) and should quickly capture the major compositional elements of the image. This means determining the placement of the subject within the shape of the paper, cropping parts of the image, etc. You’re trying to distill your compositions to the most basic, fundamental aspects so you can see the image as a whole and evaluate how the balance is working in the composition.
Small thumbnail sketches should be really simple, have very little detail, and be drawn in less than 10 minutes. If you spend longer than that, it means that you’re adding too many details, which are unimportant and can become a distraction at this stage. Keeping the time you spend on each sketch short also means that you’re more likely to punch out as many ideas as possible, as opposed to getting fixated on one sketch prematurely.
I hear people saying all the time that they don’t need to make more sketches because their first sketch was their favorite. Be the exception and produce as many sketches as possible, you’ll be pleasantly surprised at what happens when you take the time and initiative to explore your subject in depth.
Try not to think too much when you’re making these small sketches, and be willing to consider any option. This is the stage where it’s easy to experiment since the sketches are so quick, small, and so therefore you’re not heavily invested in them. Take this chance to make lots of mistakes and get bad ideas out of your system.
I often times purposefully draw the most cliche, obvious response just so I can eliminate it and move onto something more innovative. Think about this process as creating as a smorgasbord of options, creating a tremendous variety that you can then select from. (no one wants to eat at a buffet where there’s only one dish) I generally advise making a minimum of 12 small thumbnail sketches, keeping in mind that the more sketches you have, the better.
My tutorial on drawing a still life in color and drawing a self-portrait demonstrates how to create thumbnail sketches.
3)Larger sketches
After completing the small thumbnail sketches, take a step back and select 3 or 4 sketches that you feel you would like to pursue in greater depth. These larger sketches are bigger in scale, (around 9″ x 12″) and should be comparatively more developed and focused. This means adding tone, as well as a few select details.
I also recommend making the large sketches in the same medium as your final piece. This allows for a smoother segue into the final piece because mentally you’ll be in the same place with your material. Example: I see artists all the time who make their sketches in pencil, who move right away into a 6′ x 8′ oil painting, and who wonder why they’re having a tough time making that transition.
Think about these sketches as essentially the dress rehearsal for the final piece, where you’re doing the final test on all of the aspects of your sketch. These larger sketches should be reflective of all of the major components of the final piece.
A visual aspect that doesn’t exist in the final sketch, shouldn’t be randomly introduced while working on the final piece. Once you’ve completed these 3 or 4 sketches, select one to be your final piece. If the final piece you’re making is very large, it is recommended to make yet another round of even more developed sketches that are around 18″ x 24″. This provides a smoother bridge to the final size.

4) Final artwork
In theory, if you’ve done a good job in your preliminary sketches, the final piece should be mostly smooth sailing. Naturally, small challenges will arise in the execution process that are unpredictable, but you can largely avoid that if you are faithful to your sketches. Avoid last minute decisions, especially ones that affect the overall composition and physical placement of the subject matter.
These spontaneous choices can completely throw you off track and have you starting from scratch again, only this time on a drawing that you’ve already invested many hours into on a large scale. Instead, let yourself be spontaneous within the details, which can now flourish in the finished work.

Artprof.org is a free website for learning visual arts which features video tutorials, art critiques, and more.
Related articles
“How can I tell if I’m skilled enough?”
“How do you find your own individual style?”
“How do artists manage to get their soul out into images?”
“How do you make an art piece more rich with details that will catch the eye?”
“How do you learn the basics?”
“Is it bad to start another piece of art before finishing another one?”
“How do you work in a series?”
“When and how should you use photo references to draw?”
“How do you know when to stop working?”

Thanks, that was super helpful!
Working in a series has always been a challenge for me, and I usually have to remind myself how important it is to start with preliminary sketches!
thanks for this!
Reblogged this on Art and Design with Ms Lee and commented:
Excellent advice on developing an artistic idea. This is the exact thing I teach you!
I don’t usually comment on blog posts but this was AWESOME. I loved seeing the process of construction. I think as artists that becomes so veiled in the quality of a finished product, but as Frank Gehry said “a building is most beautiful when it’s half finished”.
Love the Gehry quote, I hadn’t hear that one before! Thanks for sharing.
I’m so glad I found your site. This blog is so informative, thank you so much. Please can you tell me what the support is for your arthritic hand drawing?
That’s great, thank you! I think you are talking about the brown board? If yes, that’s masonite. Btw if you like my blog, I have tons of video tutorials and more resources at https://artprof.org/
Clara, you are fantastic at verbalizing what is going on in your head during your creative process. I find this to be one of the hardest things to express to others, but the most necessary for being a good teacher. You have a real honesty and straight forward approach to talking about artistic behaviors that are totally approachable and digestible. I just wanted to thank you.
Thank you Jeffrey, really appreciate hearing your thoughts!